Film Animation Project
The film animation project is all about learning the different types of animation, the processes involved making an animation also developing our own ideas for when we create a 30 second Stop/Start animation movie for PES animation. This project will also include different techniques that are used to create stories and films.
What I intend to learn from this project is to learn the techniques of creating a Stop motion animation using Photoshop and Final cut pro.
Types of Animation
- Flip book animation – This is an animation created by drawing skills on a post it pad. It can only work if you flick through the pages really fast. This animation may consume a lot of your time when your creating it but it is cheap to make.

An example of this would be drawing a character numerous but moving slowly as the pages progress.
- Stop motion animation – This animation is created by taking lots of pictures of toys while moving them slowly. This animation will require a camera will require a high quality camera with a lot of storage and a software for joining all the images together.

An example of Stop Motion Animation would be Wallace and Gromit
- 2D animation – This animation is basically like a flip book animation but made by a software on a computer instead of a book. You do need drawing skills but there are other tools that can help you adjust the picture in what ever way you want. This software can also let you draw faster because it would probably by easy to fix a mistake.

An example of 2d would be The Lion King
- 3D animation/ CGI – The 3D animation creates a realistic effect by its stunning visuals. The software used to create 3D animation is quite powerful. This animation would probably take you the longest to create mainly because of the amount of details it requires to make one.

An example of 3d/CGI would be Finding Nemo
Analysing A Stop Motion Animation Movie
For the this topic we were assigned to analyse Wallace and Gromit The Wrong Trousers detailing then main features of how to make a Stop motion movie.
During this task we were to investigate what makes a good Stop Motion animation and there were six points that we investigated and they were: Light and Colour, Sounds used, Camera Angles, what type of audience is it appropriate for, the Mise-en-scene and the use of editing during the making of the Wallace and Gromit.

Also I learn’t more by reviewing The Nightmare Before Christmas studying this time how much effort it takes into creating a stop motion animation by looking at the job roles and what’s included with people working in the Animation Department who experiment with different of body and emotive language. Also working in the Camera and Electrical department experimenting with different shots of the characters during a scene. In the Art Department you have people working on the storyboards and the creation and sculpturing of the characters. However, in the sound department people were pre-recording special effects that gives the scene a more realistic outcome. Finally, you’d have the music department editing music during the characters singing scene.


Reviewing these two animated films we were able to understand more about how to create a Stop motion film as well as applying the knowledge into making one.
Genre’s and Generic Conventions
For this topic we were assigned with on what are genre’s and generic conventions and also looking at different types animation based movies: for example, CGI, Stop Motion and Cell/Traditional Animation.
A genre is a specific type of music, film or writing depending what it’s mainly based upon. However, a sub genre is the subcategory within the particular genre.
- Action – Action film is a genre wherein physical action takes precedence in the film. The film will often have continuous motion and action including physical stunts, chases, fights, battles, and races.
- Adventure – The conflict in an adventure story is often man against nature. A secondary plot that reinforces this kind of conflict is sometimes included.
- Comedy – Comedy is a genre of film that uses humour as a driving force. The aim of a comedy film is to illicit laughter from the audience through entertaining stories and characters.
- Crime – Crime film is a genre that revolves around the action of a criminal mastermind. A Crime film will often revolve around the criminal himself, chronicling his rise and fall.
- Fantasy – Fantasy film is a genre that incorporates imaginative and fantastic themes. These themes usually involve magic, supernatural events, or fantasy worlds.
- Horror – Horror film is a genre that aims to create a sense of fear, panic, alarm, and dread for the audience. These films are often unsettling and rely on scaring the audience through a portrayal of their worst fears and nightmares. Horror films usually centre on the arrival of an evil force, person, or event.
- Romance – Romance film can be defined as a genre wherein the plot revolves around the love between two protagonists.
- SyFi – Science Fiction film is a genre that incorporates hypothetical, science-based themes into the plot of the film. Often, this genre incorporates futuristic elements and technologies to explore social, political, and philosophical issues.
- Thriller – Thriller Film is a genre that revolves around anticipation and suspense. The aim for Thrillers is to keep the audience alert and on the edge of their seats.


During this phase we were looking at The Corpses Bride a Stop Motion Animation and we were detailing the the main features and what is included in the Animation.
Narrative Theories
During this topic I was assigned to research into the character and narrative structure theories of two people Vladimir Propp and Tzvetan Todorov and we were to explore whether or not these theories creates a successful film.
Firstly, Vladimir Propp was a Russian critic from the 1920’s who analysed folk and fairy tales and discovered 7 different types of characters and what roles they play in the films also found in today’s TV and movies.
The Antagonist (Villain)- They are on the opposing side of good who want nobody in harms way of the Villain.
The Protagonist (Hero)– They are the character who would fight off the villain and saves the day.
The Donor- They are the character that tests the hero and provides them with an advantage over the villain.
The Prize– They are the Character that has been captured by the Antagonist and is rescued by the Protagonist who falls in love with the damsel in distress.
The Dispatcher/ Supplier– They are the character that is in charge of tasking the hero with equipment or either information to get a better understanding on the villain.
The False Hero– They are the character who disguises as the hero but by doing evil deeds harming everything around them.
The Helper– They are the character that can be on the hero or villain’s side aiding their boss to succeed in their battle to win.
Although, Tzvetan Todorov discovered what makes a good Narrative Structure which is a storyline in the late 1960’s and identified 5 stages of a story.
Tzvetan Todorov is a Bulgarian-French historian, philosopher, literary critic, sociologist and essayist form the late 1960’s who identified 5 stages of a story.
![20160209_165448[1]](https://aaronteasdale458.files.wordpress.com/2015/09/20160209_1654481.jpg?w=98&h=174)
We analysed Todorov’s theory by watching Room 8. An extraordinary escape attempt blossoms after a prisoner opens a mysterious box.
The basic outline of the plot is two prisoners in a cell and they trapped in a box.
![20160209_170022[1]](https://aaronteasdale458.files.wordpress.com/2015/09/20160209_1700221.jpg?w=97&h=173) A State of Equilibrium (Equilibrium) – All is well and the setting of the atmosphere is normal and typical.
A State of Equilibrium (Equilibrium) – All is well and the setting of the atmosphere is normal and typical.
![20160209_170252[1]](https://aaronteasdale458.files.wordpress.com/2015/09/20160209_1702521.jpg?w=98&h=175) A disruption (Disruption)- Is when something occurs and disaster has the struck the scene.
A disruption (Disruption)- Is when something occurs and disaster has the struck the scene.
![20160209_170904[1]](https://aaronteasdale458.files.wordpress.com/2015/09/20160209_1709041.jpg?w=96&h=171) A recognition of disruption (Recognition)- Is when the characters realise what has gone wrong with the reaction of them beginning to occur.
A recognition of disruption (Recognition)- Is when the characters realise what has gone wrong with the reaction of them beginning to occur.
![20160209_171252[1]](https://aaronteasdale458.files.wordpress.com/2015/09/20160209_1712521.jpg?w=94&h=167) An attempt to repair damage (Repair)- Is when the characters set about trying to restore the old situation.
An attempt to repair damage (Repair)- Is when the characters set about trying to restore the old situation.
![20160209_171630[1]](https://aaronteasdale458.files.wordpress.com/2015/09/20160209_1716301.jpg?w=93&h=166) A restoration of (New Equilibrium) – Is when the day is ‘saved’ and a new situation occurs.
A restoration of (New Equilibrium) – Is when the day is ‘saved’ and a new situation occurs.
Mind maps of animation and development of ideas
During this task we were assigned with creating a mind map developing our ideas for our very own stop motion animation, I came with these ideas by watching other PES animations as well as others.
![IMG_0381[1]](https://aaronteasdale458.files.wordpress.com/2015/09/img_03811.jpg?w=162&h=216)
![IMG_0383[1]](https://aaronteasdale458.files.wordpress.com/2015/09/img_03831.jpg?w=160&h=213)

I came up with ideas from a fish animation by PES taking information to what I want for my stop motion.
In the third picture is what I intend to use as my characters in my Stop Motion Animation and mainly i will use tools and stationary in a underwater theme like in the Fish PES Animation.
Also I’m considering using everything of what i’ve got planned on my Character’s Ideas.
Perspective Drawing
For this task I was assigned to a one point perspective of street full of buildings that go into the point.
I designed the one point perspective by drawing a line that was near a quarter to the top of the A3 sheet of paper.

Drawing the dotted allowed me to draw the buildings more accurately as well as the windows. The four lines drawn from the perspective line is the area i were to draw buildings and the street.
![20160124_210931[1]](https://aaronteasdale458.files.wordpress.com/2015/09/20160124_2109311.jpg?w=262&h=147)
Once I drew the buildings and created the lines in the streets I rubbed out the lines and came up with what I drawn in the picture. Even though, what was hard about drawing this was making the windows in the first building more of a 3D element.
Stereotypes and character profiles
Stereotypes are when is a thought or assumption that’s adopted about specific types of people or certain ways of what people do and what that do. For Instance:
- All Canadians are exceptionally polite.
- Women take forever to do anything.
- Only men are good as doctors.
- All British people eat Fish & Chips.
Opening and Closing Credits in Films
For the Opening and Ending Credits I usually and expect to see every character that featured in the film and then the names of everyone else who worked behind the scenes. From the first point it’s usually the highest paid actor/actress all the way to the lowest paid. Even though, the name of the production company is required and I mainly see it just after the post credits; when I do create my own animation I’m going to look out for where is the suitable place to insert the credits in which is opted at the start or the end.
Storyboard
For my Stop Motion Animation I decided to create a Under The Sea Animation of piranhas and a shark invading peaceful life in the sea.
This is the Story Board
![IMG_0333[1]](https://aaronteasdale458.files.wordpress.com/2015/09/img_03331.jpg?w=164&h=218)
During the we realised that we decided to do a birds eye view of our animation with a underwater background.


- In the first scene is going to be a normal a scene under the sea where the fish and life is normal and peaceful and the scene will last for 5-6 seconds and will be a Birds-Eye View.
2. In scene two is going to be the build-up of a dramatic moment where piranhas invade the peace of the sea with the scene lasting for another 5 seconds and will be a close up shot of the piranhas.
3. For this scene the fish and octopus get alerted by their presence and try and swim away from the piranhas and the scene will progress for 5-10 seconds and will be a long shot of the fish turning and swimming away.
4. The scene shows that the fish and octopus swim away in an attempt to escape the piranhas and the scene progressing for 10-15 seconds and presented in a medium shot of the fish escaping within two backgrounds.
5. In this scene the fish and octopus are ambushed by another herd of piranhas trapping them in a circle being viewed for 5-10 seconds and again presented in a medium shot of the fish being surrounded.
6. At the end scene the shark comes in to appearance to eat all the fish ending the animation presented for 10-15 seconds with a close-up shot of the shark and going out into a medium from the fish being eaten.
From this point we also discussed what type of lighting and camera angles and we’d decided that our animation would be 2D so that would mean that we resorted to a Birds-eye view and we used two box files held together with rubber-bands with a mini tripod on top of the box files taped down with gaffe-tape.
![20160201_135120[1]](https://aaronteasdale458.files.wordpress.com/2015/09/20160201_1351201.jpg?w=95&h=169)
Set design and procedures
When we began to design the set of the animation I began to wonder what would be a suitable background and I thought of a underwater based theme and by that I searched on the internet to find two or three pictures that can suit the setting. The materials that were used are foam board and printed paper with adhesive spray gluing theme together instead of a normal glue stick that could leave lumps on the paper. The three I chose were for different part of the animation, for example, one setting is for when the shark appears out of nowhere and smells it’s prey. These are the three settings we chose:
![20160201_135036[1]](https://aaronteasdale458.files.wordpress.com/2015/09/20160201_1350361.jpg?w=215&h=121)
![20160201_135041[1]](https://aaronteasdale458.files.wordpress.com/2015/09/20160201_1350411.jpg?w=217&h=122)
![20160201_135044[1]](https://aaronteasdale458.files.wordpress.com/2015/09/20160201_1350441.jpg?w=214&h=120)
To take picture at a birds-eye view which we’d recommended was to use two box files held together with rubber-bands with a mini tripod on top of the box files taped down with gaffe-tape.
![20160201_135009[1]](https://aaronteasdale458.files.wordpress.com/2015/09/20160201_1350091.jpg?w=131&h=233)
![20160201_135120[1]](https://aaronteasdale458.files.wordpress.com/2015/09/20160201_1351201.jpg?w=131&h=233)
Character Development
For my animation I didn’t need any characters because I wanted to do the same thing in the Fish Animation that PES had created; instead we used: scalpels for piranhas, mini tripods for cameras as octopus, small rhino-binder clips as small fish, scissors for the shark and unused electrical wire as seaweed. What we wanted to do was to replicate what life is like under the water and how it can be disturbed by other creatures under the sea.


Creating The Film Poster Of the Animation
For this task we were assigned to create a film poster for our animation to base it like as if it were a promotion for a new animation being presented. Firstly, we resorted to Adobe Photoshop due to it being the best resource for our poster.

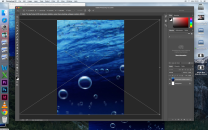

I researched google images and many images suited my demands but this particular picture in the second stood out the most because it was dark as the effects in the animation that i’d used.


Also I’d looked at tripods that are included in my animation and came up with colourful yellow ones to give it more of a soft like feeling to the poster and I also duplicated the layer to make two and blurred them in to make it more realistic to the poster and also added the name of the animation at the bottom because the top is too bright for the title to feature.


(Google Images)
For these i’d used from google images i’d pasted them to my poster and to make its my own i’d edited the white background with the eraser tool but with the third option of removing particular colours and on this occasion i’d removed the white background from them and blurred them in the poster to make it more realistic.


For the images i’d edited I also duplicated them to how many I using in my animation and also added in who is also assisting in this animation with shark as scissors edited as well in the bottom left poking it’s face out to the other fish to eat them.
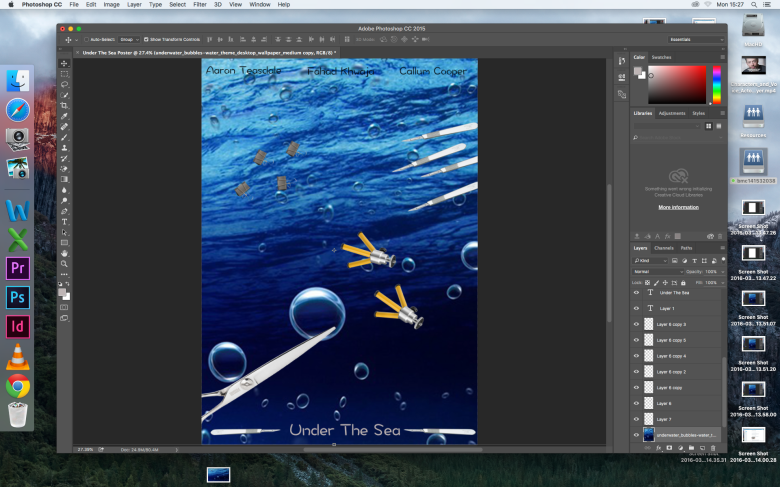
The final image of the poster is the finished product and with the cast names included at the top of the cover.
Development of Animation using Final Cut Pro
The first thing that I set before the animation was to develop a folder where I can manage my photos that I’d taken from what I did during the lessons; I did this because it would make importing the photos more easier from the folder to Final Cut Pro for every scene of my animation.


First thing I did was open Final Cut Pro and where I saved my photos I opened up File then Import then into Files where I went into my green BMC folder which is where I saved the photos which they were located in my Film Animation Part 1 folder where I highlighted and pressed choose and they were directed to Final Cut. However, once I dragged all the photos to the first line where they first appeared as 5 second bars so to render it by changing the speed from 5 seconds to 0.3 seconds per photo to make it more realistic.


Once I made the picture to 12-14 frames per second I exported the pictures into a QuickTime Movie and saved it as Sequence (1) in my BMC folder into the Film Animation Part 1 folder where it became a short movie and once I dragged it down to the first line it became a sequence not lines of photos which is required and once I completed this for every scene for the movie I moved onto what I could do for sounds and for that I went onto Soundtrack Pro where I found sounds of dramatic moments which I intended to use for some parts of the movie and also used sounds from Freesound.org where I looked for fish sounds and shark music.
When filming and editing the animation, it became really hard to ensure that nothing was wrong and it became time consuming to rendering all the problems we faced. Also creating the sound became hard to discover and use but we eventually found where we could find music and sound effects and it was located in Soundtrack Pro.


Once I’d finished the entire film making I resorted to working on my 3D element which was critical to include to ensuring the animation had an 3D object inside the animation and also including opening and closing credits. What became difficult about this part is that we took too much time making the film and didn’t pay much attention to the 3D element and the use of the credits which only gave us 3 hours to plan and perfect our credits and 3D element.
Even though, in the end we’d manage to create a box with a underwater background rotating the end credits clockwise from the creativity of the animation to the people who created the animation which was Myself, Callum Cooper and Fahad Khwaja.
Analysing Elements Involving Time Throughout The Animation
From analysing certain Stop Motion Animations we’d found out on average it takes 12-14 frames per second to create just one second worth of film, if fewer or more photos are in the second it may look distorted or probably to quick for people to see. So if the movie had the right amount of material inside of a second and still showed errors then it may be down to one thing moved to far for the character to jump a distance on one picture then from another to come back or so short it would require more time over 30 and maybe go over the maximum of a minute and when reviewing the final video on Final Cut Pro it wouldn’t show much effect into the Animation and it may not look professional in which is the standard we are meant to work at. (minimum we needed to produce was 360-420 pictures worth 30 seconds of film).
By learning the skills I learnt from using Final Cut Pro was if I were to alter length of a scene/clip to 50% it would render the scene into becoming longer. However, if I were to render it by 150% it would lead up to the scene being sped up making it more of hilarious outlook also reducing the length of the scene. What I have taken to note is that I’ve selected scenes that I wanted to obtain creating a folder for when I take pictures in every lesson I use a camera to take picture. After completing my work with cameras all I needed to completed was to send all my pictures to my created folder (Film Animation Part 1) and if any were useless or unorthodox I’d delete it with only useful pictures left over.
Also creating and designing the set only took 10 minutes to discuss and complete with only using three underwater pictures acting out as scenes for the Animation and for when it came to figuring out what we were going to use as fish, octopus and piranhas it took nearly a lesson to find something to suit the demands of what we needed and scalpels for piranhas, mini tripods used for cameras as octopus and small rhino-binder clips as small fish. However, it took ages to figure out what we were going to use as a shark; the first thing that we thought of was a pencil case but once we’d place it in-front of our camera it nearly filled in too much space so we had thought of something else more deadly like a pair of scissors which looks deadly and vicious like a shark so we used that as our predator hunting it’s prey.
Film Animation Evaluation
The whole of the objective of this project was to develop and create a Stop Motion Animation lasting between 30-60 seconds for a company known as PES and working through this project would help us develop and improve our skills correctly on using Final Cut Pro analysing animations using the same type of resources but comparing my animation but with less professional standards applied into the animation reasons are that we ha: less time to develop our video producing it to a good quality with time not being on our side and we’d only used one camera with poor quality of lighting for professional art crews have more time and resources to make a high quality Stop Motion Animation for example, The Nightmare Before Christmas.
To get a better understanding of Stop Motion Animation we were to watch and compare the differences from Wallace & Gromit and The Nightmare Before Christmas; by looking at these two animation movies The Nightmare Before Christmas from the set design to the duration of the animation which TNBC had the biggest set and had taken years to make, from doing this I also learnt how to design and produce a perspective drawing which helped me with creating my animation because it gave me a clear idea what sort of camera angles to apply for what sequences and what other angles can make it better. I think that the drawing of the perspective drawing went well but how it affects me for future development is for when I move onto level 3 media for where the skill is required in greater detail. What became clear was that that when the tripod was gaffa-taped to the box files it always presented the bottom of the box files when the camera was at a birds-eye view which became difficult to render. During the animation we used Final Cut Pro and Adobe Photoshop and the problem I faced was rendering the sounds and effects to match the pattern of movement and the atmosphere of the music when something bad happens in the animation.
When creating the background scenes and set design had made develop new skills on creating and designing sets it helps me because it allows me to know the basics on creating and designing sets for future development.
When developing the set of my roles I had to find backgrounds that would be suitable for my underwater theme which is the animation that I did produce. Moreover, we had stuck with our original idea of how our video will be played out and didn’t change a alteration. The materials that were required for my set design was foam board and printed paper but we didn’t use characters we used props to film our animation the reason is that we’d watch a animation from PES and they used tools and equipment for their animation which is what we are proposing as well.
For what we had to take into consideration was the subject of filming the animation which I thought that filming wouldn’t take long but it did over 3-4 weeks to finish filming, doing the storyboard also took time because we came up with the original idea but we had doubts on whether or not we’d obtain the props, even though we eventually obtained them reducing our time on editing out our mistakes which were only minor issues which were able to render.
I think overall the animation looks successful and achieved all the objectives on the project brief. I do believe that the animation does relate to what we were achieving. Also if there was improvements that I would include is to add more dramatic music to drag the attention of the viewers because without that it’ll sound boring with just only sound effects because they’ll be silent moments in the film that won’t represent the animation in a professional standard. To be honest the project has made me develop personally because during this project i’ve learnt how to edit in more detail with audio and sounds which is helpful for future development if I want to advance to level 3 and it also gives me the ability to teach a fellow student on how to control and use these effects and editing correctly without them facing major errors which will make them end up starting all over again if it were a long filming process.
